¶ Preparation
Check the requirements before beginning.
Rebooting the Defend-O-Tron after placing it inline with your firewall and ISP will result in temporary loss of internet connectivity as the protection zone goes offline and is re-initialized.
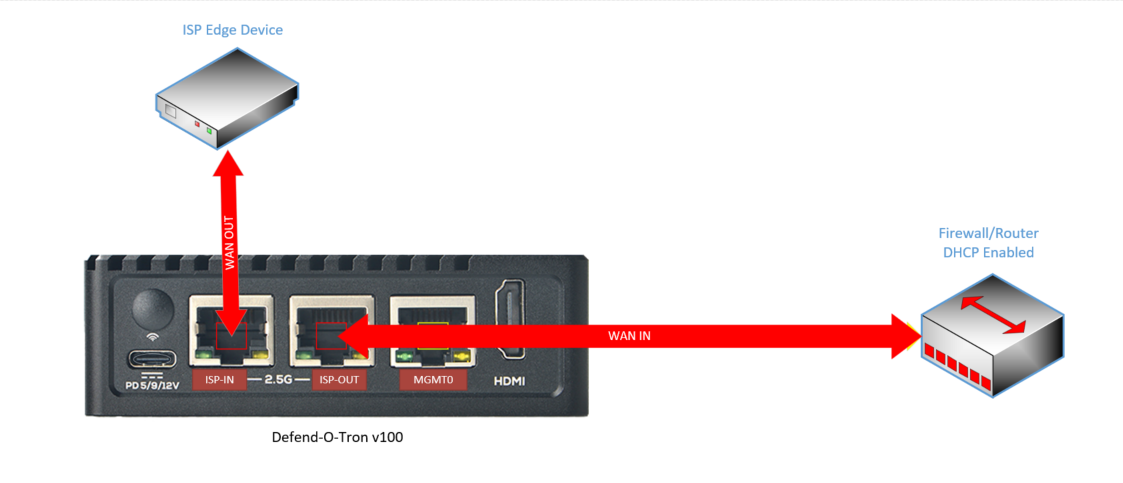
The Defend-O-Tron will need to be situated in a location close to the ISP equipment and your firewall/router, in order to cable the protected zone which goes from the ISP edge device (i.e. Cable/DSL Modem, ONT/ONU, ISP Router) to your on-site equipment WAN port.
¶ Checklist
Use this list and checks below to assist in your Defend-O-Tron deployment, simply print the page and follow the steps.
- Preparation Completed
- Initial Setup Completed
- Management Connectivity Completed
- Verify Management Connectivity Completed
- First Login Completed
- Change Admin Password Completed
- Cable Protected Zone Completed
- Physical Protection Completed
- Next Steps Completed
Placing the Defend-O-Tron inline with your ISP and Firewall/Router is the last step after verifying management connectivity.
¶ Initial Setup
The initial setup requires you connect and configure the Defend-O-Tron management network and the power adapter.
¶ Cabling
Each port listed below on the Defend-O-Tron serves a distinct purpose and must be cabled correctly in order to operate.
Ethernet Ports
- MGMT0. Provides management connectivity and should also provide connection to the internet.
- ISP-IN. Provides ingress data from your ISP equipment to the protected zone.
- ISP-OUT. Provides egress data from your local firewall/router to the protected zone.
Power Port
- PO5/9/12v. Provides DC power to the device.
Optional Ports
- HDMI. Provides a connection for an HDMI compatible monitor.
- USB3. Provides a connection for keyboard or USB flash drive.
- UART0. Provides Serial connectivity to the console only.
¶ Connect Management LAN
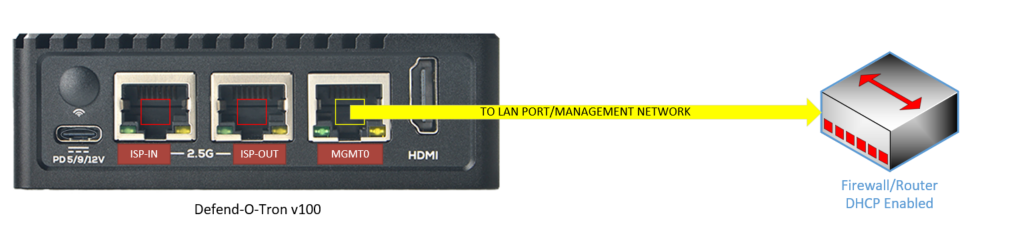
The management port for the Defend-O-Tron is connected to your network, either directly to the firewall/router OR to a switch that connects to a management network. Either connection must have DHCP enabled. In simple setups the management network could be your default LAN network, it just needs to be a network that is accessible to the LAN side for you to manage and a gateway to the internet for updates. Most manufacturers will denote the LAN side ports with a color or label.
- Connect the MGMT0 port to a LAN port on your router
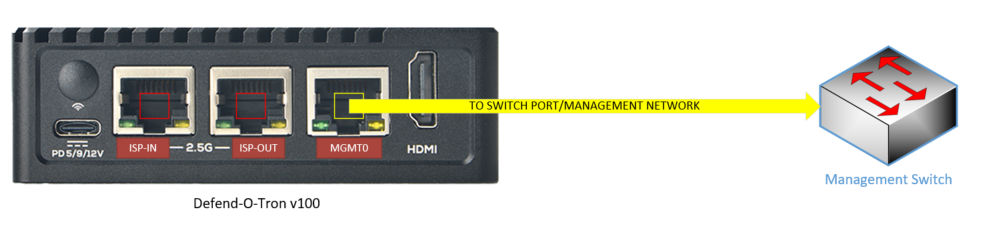
OR VIA Switch
- Connect the MGMT0 port to a switch port on your management network.
¶ Connect Power
After the management network connection is completed, connect the power module to the USB-C connector.
- Connect the 5 volt power supply and power on the device only after you have the management network connected.

The power adapter has a on/off switch make sure it's in the on position and the red sys-LED on the front is blinking.
¶ Management Connectivity
The management interface is configured for DHCP (IPv4 only) via netplan, the standard network configuration tool on modern Debian/Armbian systems. The configuration lives at /etc/netplan/10-mgmt0.yaml and can be customised for VLANs, IPv6, or a static IP — see the Management via VLAN and Management via Console tabs below.
If the device cannot reach a DHCP server, the management interface will have no IPv4 address and cannot be reached over the network. Use the HDMI console or serial console (see the relevant tabs below) to edit
/etc/netplan/10-mgmt0.yaml, then runsudo netplan apply.
We suggest making the DHCP client lease static (a reservation on your DHCP server) so users accessing the DNS server on the Defend-O-Tron have a consistent IP address to query.
Below are optional management configuration scenarios and normally you will not require them, they are list here as a reference for situations or I.T. policies that would require them.
Similar to the serial option, this allows you to connect an HDMI compatible monitor and USB keyboard to perform command line management. You can also just plug in a monitor only and observe the boot process.
The boot screen will also display the management IP address of the Defend-O-Tron.
Once the device has finished its first boot, the console banner shows:
- The management IP address assigned by your DHCP server.
- The Web Admin URLs — by IP (
https://<management-ip>:9090) and by FQDN (https://defend-o-tron.protected.lan). - The DNS configuration hint — the IP to point your router or DNS proxy at.
- Dashboard URLs — AdGuard DNS console (
https://adguard.protected.lan) and the System Dashboard / Grafana (https://dashboard.protected.lan/grafana). - The base domain the device serves on the protected LAN (
protected.lanby default).
If you see the banner but the IP address is blank or shows the wrong network, your management interface isn't pulling DHCP — verify cabling and DHCP server reachability, or use the Management via Console / Management via VLAN tabs above to set a static address.
If your management network is on a separate tagged VLAN, configure the mgmt0 interface to receive that VLAN's traffic by editing the netplan configuration file.
The simpler approach — recommended whenever possible — is to configure your switch port as an access port for the management VLAN (see the Management via access port tab). That way the Defend-O-Tron sees untagged traffic and uses the default DHCP configuration with no changes required on the device.
If editing the device's netplan config is your only option, replace <vlan-id> with your VLAN ID (e.g. 10):
¶ ~$ sudo nano /etc/netplan/10-mgmt0.yaml
network:
  version: 2
  renderer: networkd
  ethernets:
    mgmt0:
      dhcp4: false
      dhcp6: false
      accept-ra: false
  vlans:
    vlan<vlan-id>:
      id: <vlan-id>
      link: mgmt0
      dhcp4: true
      dhcp6: false
      nameservers:
        addresses:
          - 127.0.0.1
        search:
          - "protected.lan"
This brings mgmt0 up without an IP, just carrying tagged traffic, and creates vlan<id> as the actual management interface that pulls a DHCP lease.
Apply the change with:
~$ sudo netplan apply
If netplan apply reports a configuration error, the netplan file has a syntax problem. Validate before applying with sudo netplan generate — it surfaces errors without bringing the interface down. When in doubt, reboot the Defend-O-Tron to ensure all services pick up the new IP address.
Netplan files must be valid YAML — indentation matters. The example above uses two-space indentation throughout. Tabs will be rejected.
If you have your Defend-O-Tron connected to a VLAN capable switch you can configure the port connecting to management as an ACCESS port (VLAN PVID) instead of having to add the VLAN to the device.
PVID stands for "Port VLAN ID" and is used in VLAN applications and it can be used to set an untagged traffic received by a given port(s) as a member of a specific VLAN. This is usually ubiquitous with Access Port.
Access ports are network switch ports that are configured to carry network traffic for a specific virtual LAN (VLAN) only. These switch ports are connected with devices such as end user devices within a specified VLAN. Consult your device documentation to see specific information about access ports.
Here are some typical switch access port configurations.
NOTE: These are only examples and actual interface and bridge names may be different in your environment, consult your I.T. administrator if you are unsure.
¶ Cisco switch (IOS 12.X, 15.X)
In this example your Defend-O-Tron is connected to port 10 on the switch.
To set port 10 as an Ethernet access port that carries traffic for VLAN XX only:
switch# configure terminal
switch(config)# interface FastEthernet 0/10
switch(config-if)# switchport mode access
switch(config-if)# switchport access vlan XX
¶ MikroTik switch (CRS-X series)
In this example your Defend-O-Tron is connected to port ether1 on the switch.
To set port ether1 as an Ethernet access port that carries traffic for VLAN XX only:
/interface bridge
add comment="Master Switch Bridge" name=switch-bridge vlan-filtering=yes

/interface bridge port
add bridge=switch-bridge comment="Defend-O-Tron" interface=ether1 pvid=XX

/interface bridge vlan
add bridge=switch-bridge untagged="ether1" vlan-ids=XX
¶ Dlink Switch
A detailed guide on Dlink switch setup is here DGS-1510
The Defend-O-Tron comes with in optional serial port to perform basic command line management in situations where technicians need quick access with limited resources. You should be familiar with Linux command line syntax when using this option.
Download and install Minicom for Linux or Putty for Windows.
Use the following serial parameters:
Baud rate: 1500000
Data bit: 8
Parity check: None
Stop bit: 1
Flow control: None
user@host:~# minicom -b 1500000 -D /dev/ttySx (replace x with the TTY port)
¶ DNS
The DNS provided by the Defend-O-Tron is Adguard Home, this is an AD blocking DNS with additional safeguard features to help mitigate data privacy leaks. It also allows you to view which sites your users are visiting via logging.
You will require the DNS on the Defend-O-Tron if you wish to access the dashboards and DNS management utilities. Different router manufactures have their own methods to perform this task, contact your I.T. administrator or consult your router documentation for further information.
To configure the Defend-O-Tron as a DNS server for your network you will need to override the default DNS server IP address that your router or management network provides. Typically this is ether the ISP's DNS servers or an upstream provider such as Google or Cloudflare.
If you have deployed an internal DNS server you can set the Defend-O-Tron DNS as an upstream provider or forwarder.
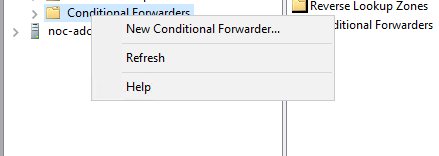
¶ Windows Server DNS Forwarder
In the Windows server DNS manager, right click on "Conditional Forwarders" and select "New Conditional Forwarder"
Enter protected.lan in the DNS Domain box, and the management IP address of the Defend-O-Tron.
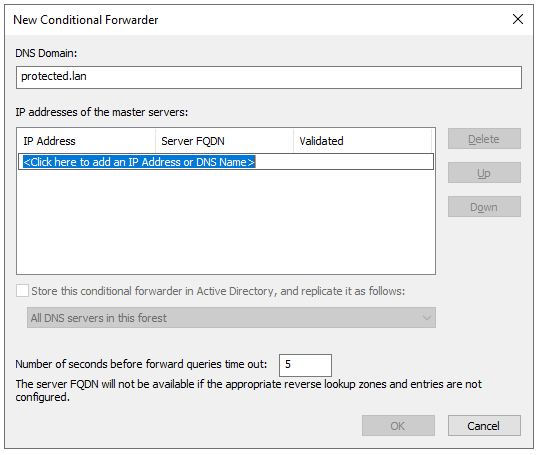
Click OK.
¶ Verify Management Connectivity
Once you know the management IP address of the device you can test connectivity by browsing to the administration web ui. (See below)
Other ways to check connectivity:
- Ping the device by IP address from Windows or Linux
- Ping the device by FQDN from Windows or Linux
- Logon to the console and ping an external host, such as google.com
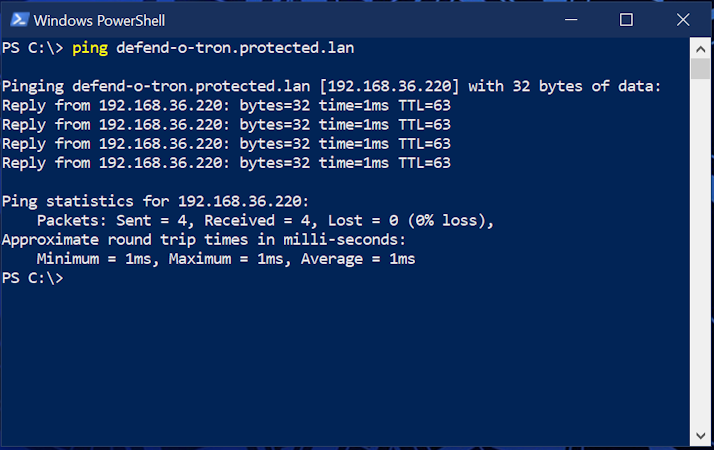
Ping the Defend-O-Tron by FQDN, it should respond as shown with the IP address. Your DNS is working if the request is successfull, if not you'll need to check the DNS configuration.
Windows will sometimes require you to either reboot or flush the DNS cache on your system.
Open the command prompt (cmd.exe) or powershell console (powershell.exe).
In a terminal window on your linux device
~ % ping defend-o-tron.protected.lan -c 5
PING defend-o-tron.protected.lan(defend-o-tron.protected.lan (192.168.10.1)) 56 data bytes
64 bytes from defend-o-tron.protected.lan (192.168.10.1): icmp_seq=1 ttl=64 time=0.115 ms
64 bytes from defend-o-tron.protected.lan (192.168.10.1): icmp_seq=2 ttl=64 time=0.120 ms
64 bytes from defend-o-tron.protected.lan (192.168.10.1): icmp_seq=3 ttl=64 time=0.117 ms
64 bytes from defend-o-tron.protected.lan (192.168.10.1): icmp_seq=4 ttl=64 time=0.114 ms
64 bytes from defend-o-tron.protected.lan (192.168.10.1): icmp_seq=5 ttl=64 time=0.121 ms

--- defend-o-tron.protected.lan ping statistics ---
5 packets transmitted, 5 received, 0% packet loss, time 4088ms
rtt min/avg/max/mdev = 0.114/0.117/0.121/0.002 ms
You will need an adminitrative command prompt to perform this action. Once completed retest the ping.
PS C:\> ipconfig /flushdns

Windows IP Configuration

Successfully flushed the DNS Resolver Cache.
¶ First Login
The IP address assigned to the Defend-O-Tron is shown on the console only, if you want to see that you'll need to attach an HDMI compatible monitor to the device. Otherwise your DHCP server should contain the management IP address of the Defend-O-Tron with a fully qualified domain name (FQDN) of defend-o-tron.protected.lan. Consult your DHCP documentation in order to lookup client leases.
Browse to the Defend-O-Tron web interface using http://<management-ip>:9090 where <management-ip> is the IP address of the device on your management network. If you've configured DNS, you can use the friendly hostname instead: https://defend-o-tron.protected.lan:9090.
It will appear like this here.
The management console is reachable through several URLs, each of which works at any time:
https://defend-o-tron.protected.lan/— via the device's reverse proxy and built-in DNS. Cleanest experience once you've installed the Root CA.https://<management-ip>/— same proxy path, by IP. Works without DNS configuration.https://<management-ip>:9090/— direct to Cockpit on port 9090, bypassing the reverse proxy. Useful for troubleshooting if the reverse proxy is misbehaving.http://<management-ip>:9090/— plaintext Cockpit on port 9090. Convenient for first-time login before you've installed the Root CA, but always switch to HTTPS for everyday administration.
¶ Default Login Credentials
- The default username and password for the management GUI are admin/admin.
You will be required to change this password upon first login. - The default username and password for AdGuard are admin/adguard
This is protected by AdGuard and can only be changed in the terminal. - The default username and password for the Crowdsec Grafana dashboards are admin/admin
You will be prompted to change this when logging in, you can also skip it if required.
¶ Cable Protected Zone
To place the Defend-O-Tron inline with your ISP and firewall/router first locate the WAN port on your router, this will be the ethernet port that currently connects to the ISP edge device. Most manufacturers will denote the WAN port with a different colored port than the LAN ports.
¶ Types of ISP Edge Devices
Here are some typical ISP edge devices you may encounter in your environment. It is important to understand how each one of the devices will supply you an internet connection via ethernet before connecting your Defend-O-Tron.
- Cable/DOCSIS Modem
- DSL/xDSL Modem
- GPON/XPON ONU Modem
- Wireless Point To Point (PTP) Bridge
- Fiber Media Converter (Active fiber)
¶ Connecting to the ISP device
- Unplug the WAN cable from your router and plug it into ISP-IN on the Defend-O-Tron
This is the cable from the ISP edge device - Plug the ISP-OUT port into your router where the cable in the previous step was plugged into.
- Verify internet connectivity. Browse to Google on your workstation.
You may need to reboot your Firewall/Router to obtain or renew it's IP address.
- Connect the Ethernet ISP-IN to the ISP edge device WAN port
- Connect the Ethernet ISP-OUT to the firewall/router WAN port
¶ Physical Protection
The Defend-O-Tron is ideally secured and away from any unauthorized personnel who could access it. Gaining physical access to any device, not just the Defend-O-Tron can allow bad actors to penetrate or exploit your security equipment.
Keep the following in mind:
- Don't place it in a tight location with little or no air-flow
- Don't hide it away in an un-monitored area
- Keep the location secured and locked when not servicing it
- When possible keep a log of personnel accessing it
- Video surveillance is a good idea
¶ Next Steps
- Download and install the Root CA certificate on your management workstation for a clean HTTPS experience (Windows, macOS, Linux, and Firefox covered).
- Set up the DNS filter — point your network's DNS at the Defend-O-Tron to enable AdGuard filtering.
- Tour the dashboards — Cyber-Threat overview, CrowdSec metrics, NIS2 Evidence Pack, Traefik proxy status, and the enhanced system overview.
- Check the Firmware Image page — see what firmware version your device shipped with and whether an update is available.
- Read the Compliance Reporting page if NIS2, SOC 2, or similar audit reporting is on your roadmap. The audit subsystem runs automatically from day one.