Threat activity → Bouncers lists the systems that receive the Defend-O-Tron’s bans, and connects new ones. This page explains how, with a setup for each kind of system.
¶ What the CrowdSec API Is
The Defend-O-Tron offers its CrowdSec Local API (LAPI) so other systems can use the same live threat decisions. Each of those systems runs a small piece of software called a bouncer. The bouncer reads the decisions from the Defend-O-Tron and blocks those addresses on its own system.
One Defend-O-Tron can feed many bouncers: your office router, your web servers, branch-office firewalls, all from the same threat picture. Only the decisions travel; your traffic does not pass through the Defend-O-Tron for this.
¶ What Connecting a Bouncer Gives You
- Shared threat intelligence. Your other firewall, web server or reverse proxy blocks the same addresses the Defend-O-Tron has found, plus the CrowdSec community blocklist the device uses.
- Quick updates. Most bouncers check for new decisions every 10 to 60 seconds.
- Local enforcement. Each bouncer blocks on its own system, so there is no extra delay for your traffic.
- One key per system. Each bouncer has its own API key, so you can see which system read the decisions and when, and remove one without touching the others.
¶ Connection Essentials
Every bouncer, on any platform, needs the same four things:
| What | Value |
|---|---|
| LAPI address | https://crowdsec.protected.lan/lapi/ (the /lapi/ path is required) |
| Authentication | A bouncer API key, one per system, made on the Defend-O-Tron |
| TLS trust | The Defend-O-Tron Root CA installed on the other system |
| DNS | The other system must find crowdsec.protected.lan |
The other system must also be allowed through the Defend-O-Tron’s firewall: its address must be in Management allowed addresses on the Firewall page.
¶ Step 1: Create a Bouncer Key
In the web interface, go to Threat activity → Bouncers, click Connect another system…, enter a name for the other system (branch-office-router, prod-nginx-01 and so on), and click Create key. The page shows the LAPI address and the new key, with a Copy key button.
Copy the key now. It is shown only once: the Defend-O-Tron keeps only a hash of it, so it cannot be shown again. If you lose it, delete the bouncer and create it again.
The step-by-step guide, with screenshots and the firewall step, is Connect Another System to the Block List.
The examples below use the placeholder key abc123def456ghi789jkl012mno345pqr678stu901vwx234yz567. Use your own.
¶ Step 2: Make the Other System Find crowdsec.protected.lan
The bouncer connects by name, not by address, because the certificate check needs the name to match the certificate.
- Preferred: make your network’s DNS send
protected.lanlookups to the Defend-O-Tron. See Use the Defend-O-Tron for DNS. - For one system only: add a line to its hosts file.
- Linux or BSD:
echo "<management ip> crowdsec.protected.lan" | sudo tee -a /etc/hosts - Windows: add
<management ip> crowdsec.protected.lantoC:\Windows\System32\drivers\etc\hosts, as Administrator.
- Linux or BSD:
¶ Step 3: Install the Root CA on the Other System
The LAPI uses HTTPS with the Defend-O-Tron’s certificate, so the other system must trust the Root CA. Download it from Device → Certificates and install it in the other system’s trust store. See Certificates for Windows, macOS, Linux and the browsers. Each bouncer tab below also says where that bouncer looks for it.
¶ Step 4: Configure the Bouncer
Pick the tab for your platform. These bouncers are made by CrowdSec or by their community, not by Awesome-O; their own documentation is linked in each tab.
For a Debian or Ubuntu server (web server, application server, Linux router) where you want to drop traffic from blocked addresses in the system firewall. See CrowdSec’s firewall bouncer documentation.
¶ Install
The packages are in CrowdSec’s own package repository. Add it first, as CrowdSec’s Linux installation guide shows, then:
sudo apt install crowdsec-firewall-bouncer-nftables
Use crowdsec-firewall-bouncer-iptables instead if the system uses iptables.
¶ Configure
Put your settings in /etc/crowdsec/bouncers/crowdsec-firewall-bouncer.yaml.local, which overrides the main file and survives package updates:
api_url: https://crowdsec.protected.lan/lapi/
api_key: abc123def456ghi789jkl012mno345pqr678stu901vwx234yz567
update_frequency: 10s
insecure_skip_verify: false
The bouncer checks the certificate against the system’s trust store, so install the Root CA there first (Step 3).
Leave
insecure_skip_verify: false. With the Root CA installed, the certificate check works, and turning it off removes the protection HTTPS gives.
¶ Start and check
sudo systemctl restart crowdsec-firewall-bouncer
sudo systemctl status crowdsec-firewall-bouncer
sudo journalctl -u crowdsec-firewall-bouncer -n 50
In nftables mode, the bouncer fills the tables crowdsec (IPv4) and crowdsec6 (IPv6). Check them with sudo nft list table ip crowdsec.
For an NGINX reverse proxy or web server where you want to refuse blocked addresses at the web level. See CrowdSec’s NGINX bouncer documentation.
¶ Install
Add CrowdSec’s package repository first (as for the Linux firewall bouncer), then:
sudo apt install crowdsec-nginx-bouncer
The package adds a Lua module that NGINX runs on every request.
¶ Configure
Put your settings in /etc/crowdsec/bouncers/crowdsec-nginx-bouncer.conf (or a .local file next to it, which takes precedence):
API_URL=https://crowdsec.protected.lan/lapi/
API_KEY=abc123def456ghi789jkl012mno345pqr678stu901vwx234yz567
MODE=stream
UPDATE_FREQUENCY=10
BOUNCING_ON_TYPE=all
The bouncer checks the certificate against the file NGINX’s lua_ssl_trusted_certificate setting names, normally the system bundle /etc/ssl/certs/ca-certificates.crt. Install the Root CA in the system trust store first (Step 3), then restart NGINX:
sudo systemctl restart nginx
¶ Check
The bouncer writes to NGINX’s error log, with lines starting [Crowdsec]. A blocked address gets a 403 page. Test from an address listed on Threat activity → Decisions.
For a Traefik reverse proxy where you want the decisions enforced as a middleware, with the community crowdsec-bouncer-traefik-plugin.
¶ Install the plugin
Add it to Traefik’s static configuration (traefik.yml or equivalent). Use the latest version shown on the plugin’s page:
experimental:
  plugins:
    crowdsec-bouncer-traefik-plugin:
      moduleName: github.com/maxlerebourg/crowdsec-bouncer-traefik-plugin
      version: vX.Y.Z
¶ Configure the middleware
Add it to Traefik’s dynamic configuration:
http:
  middlewares:
    crowdsec:
      plugin:
        crowdsec-bouncer-traefik-plugin:
          enabled: true
          crowdsecMode: stream
          updateIntervalSeconds: 60
          crowdsecLapiScheme: https
          crowdsecLapiHost: crowdsec.protected.lan
          crowdsecLapiPath: /lapi/
          crowdsecLapiKey: abc123def456ghi789jkl012mno345pqr678stu901vwx234yz567
          crowdsecLapiTLSCertificateAuthority: |-
            -----BEGIN CERTIFICATE-----
            (the Root CA, as shown under Certificate (PEM) on the Certificates page)
            -----END CERTIFICATE-----
crowdsecLapiPath must end with /. Giving the Root CA here means Traefik does not need it in its own trust store.
¶ Use it on your routers
Add the middleware to the routers you want to protect:
http:
  routers:
    my-app:
      rule: Host(`app.example.com`)
      service: my-app
      middlewares:
        - crowdsec
From a router defined by another provider (for example Docker labels), refer to it as crowdsec@file. Restart Traefik and check its log for errors from the plugin.
For a MikroTik RouterOS device, with the community cs-mikrotik-bouncer-alt. Its full documentation is at nvtkaszpir.github.io/cs-mikrotik-bouncer-alt.
The bouncer runs next to the MikroTik, on a Linux system (often a small VM or a Raspberry Pi), not on RouterOS itself. It reads the decisions from the Defend-O-Tron and writes them to the MikroTik through its API.
How it works: every hour, and whenever a new decision arrives, the bouncer builds a new address list on the MikroTik (named crowdsec_ and the time), then points your CrowdSec firewall rules at that list. Empty old lists are removed. So you create the rules once, and tell the bouncer their rule numbers.
¶ 1. Give the bouncer API access on RouterOS
- Under IP → Services, turn on the API.
api-ssl(port 8729) needs a certificate on the router; plainapi(port 8728) sends the password unencrypted, so use it only on a trusted network. In Available From, allow only the bouncer’s address. - Make a group and a user for the bouncer:
/user group add name=crowdsec policy=api,read,write
/user add name=crowdsec-bouncer password=<set-a-strong-one> group=crowdsec address=<bouncer ip>
¶ 2. Create the firewall rules
Create the drop rules near the top of your firewall, then note their numbers. The bouncer changes which address list each rule uses; you create the rules with the list name crowdsec. Replace ether1 with your internet-facing interface.
Filter rules (IPv4):
/ip firewall filter
add chain=input src-address-list=crowdsec in-interface=ether1 action=drop place-before=1 comment="crowdsec input drop rules - src"
add chain=forward src-address-list=crowdsec in-interface=ether1 action=drop place-before=1 comment="crowdsec forward drop rules - src"
add chain=input dst-address-list=crowdsec action=drop place-before=1 comment="crowdsec input drop rules - dst"
add chain=forward dst-address-list=crowdsec action=drop place-before=1 comment="crowdsec forward drop rules - dst"
Raw rules (IPv4). They run earlier and need less memory and CPU than filter rules:
/ip firewall raw
add chain=prerouting src-address-list=crowdsec in-interface=ether1 action=drop comment="crowdsec prerouting drop rules - src"
add chain=prerouting dst-address-list=crowdsec action=drop comment="crowdsec prerouting drop rules - dst"
add chain=output dst-address-list=crowdsec action=drop comment="crowdsec output drop rules - dst"
If you use IPv6, add the same rules under /ipv6 firewall filter and /ipv6 firewall raw. Order matters: keep these rules above the rules that accept traffic. To try them safely first, create them with action=passthrough and watch their counters, then change them to drop one by one.
Find each rule’s number in the leftmost column:
/ip firewall filter print without-paging
/ip firewall raw print without-paging
¶ 3. Run the bouncer
On the Linux system, install the Root CA in its trust store (see Step 3 above). Then make a folder with two files.
.env (keep it private: it holds the API key and the router password):
CROWDSEC_URL=https://crowdsec.protected.lan/lapi/
CROWDSEC_BOUNCER_API_KEY=abc123def456ghi789jkl012mno345pqr678stu901vwx234yz567
MIKROTIK_HOST=192.168.88.1:8729
MIKROTIK_USER=crowdsec-bouncer
MIKROTIK_PASS=<the password you set>
MIKROTIK_TLS=true
MIKROTIK_IPV6=false
IP_FIREWALL_FILTER_RULES_SRC=1,2
IP_FIREWALL_FILTER_RULES_DST=3,4
IP_FIREWALL_RAW_RULES_SRC=1
IP_FIREWALL_RAW_RULES_DST=2,3
GOMAXPROCS=1
Use your own rule numbers. Keep CROWDSEC_URL exactly as shown, ending with /lapi/. If you use IPv6, set MIKROTIK_IPV6=true and add the IPV6_FIREWALL_FILTER_RULES_SRC, IPV6_FIREWALL_FILTER_RULES_DST, IPV6_FIREWALL_RAW_RULES_SRC and IPV6_FIREWALL_RAW_RULES_DST numbers too.
docker-compose.yaml:
services:
  mikrotik-bouncer:
    image: quay.io/kaszpir/cs-mikrotik-bouncer-alt:latest
    restart: unless-stopped
    env_file: .env
    volumes:
      - /etc/ssl/certs:/etc/ssl/certs:ro
The volume gives the container the Linux system’s trust store, with the Root CA in it. Start it with docker compose up -d, and check docker compose logs -f.
The bouncer serves metrics on port 2112 without any password. The example above does not publish that port; keep it that way unless you need the metrics, and then only on a trusted network.
For a pfSense firewall, with CrowdSec’s pfSense package. It can run only its firewall bouncer and use the Defend-O-Tron’s LAPI.
¶ Trust the Root CA
- Go to System → Certificates → Authorities and click Add.
- Choose Import an existing Certificate Authority, and paste the Root CA from the Certificates page.
- Tick Add this Certificate Authority to the Operating System Trust Store, and click Save.
¶ Install
- Go to System → Package Manager → Available Packages.
- Search for
crowdsec, and click Install.
¶ Configure
Go to Services → CrowdSec, then:
- Under Local API, clear Enable.
- Under Log processor (CrowdSec agent), clear Enable. The pfSense box then only applies the Defend-O-Tron’s decisions.
- Under Remote LAPI, set Remote LAPI URL to
https://crowdsec.protected.lan/lapi/and Firewall bouncer API key to your key. Leave Login and Password empty: they are only for a log processor. - Keep the Firewall bouncer enabled, and click Save.
The package makes its own block rules, on all interfaces and in both directions, with the tables crowdsec_blacklists (IPv4) and crowdsec6_blacklists (IPv6). The rules are hidden in the pfSense interface. To see the blocked addresses, open Diagnostics → Tables and choose a CrowdSec table.
¶ Step 5: Check That the Bouncer Is Connected
Back in the web interface, open Threat activity → Bouncers. Within a minute, your new bouncer shows a recent time under Last read, with its address, type and version. The Not reading box counts the bouncers that have not read the decisions in the last 5 minutes.
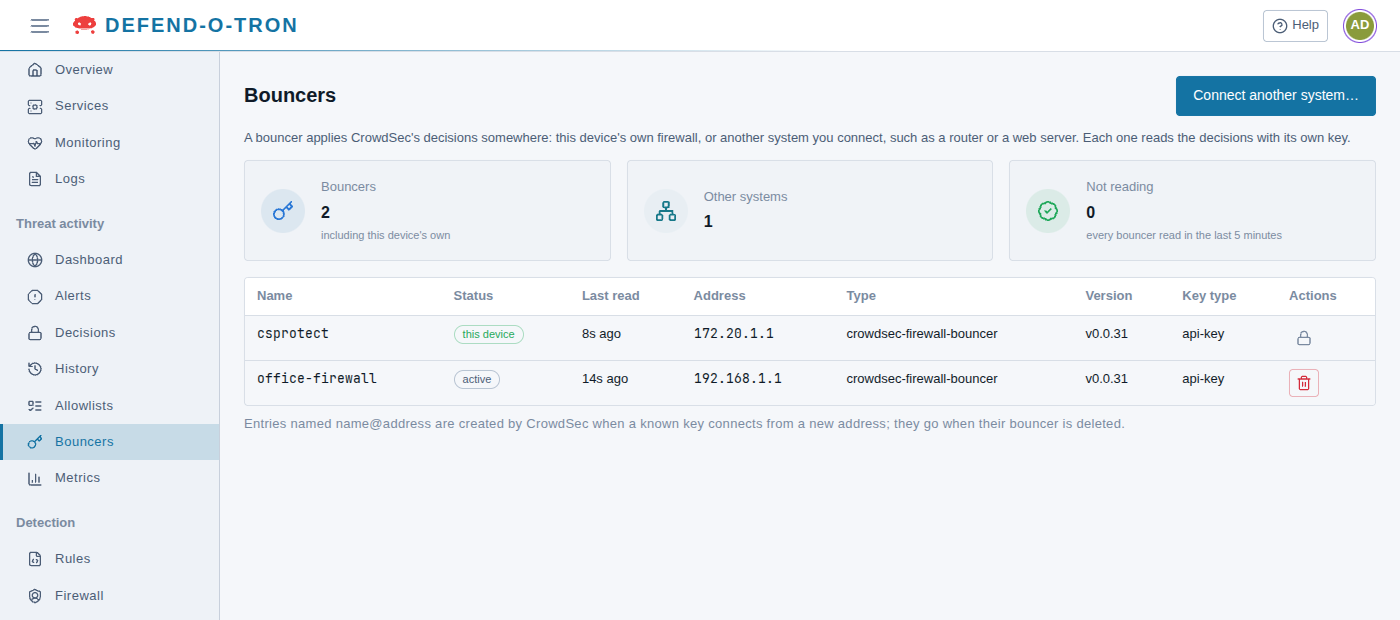
If Last read stays empty, see Troubleshooting below.
¶ Managing Bouncers
Everything is on the Threat activity → Bouncers page:
| Task | How |
|---|---|
| See every bouncer and when it last read | The table on the page |
| Remove a bouncer and revoke its key | The red bin button on its row. You type the bouncer’s name to confirm. |
| Make a new key | Delete the bouncer, then Connect another system… with the same name |
The Defend-O-Tron’s own bouncer is marked this device and cannot be deleted. Entries named name@address are created by CrowdSec when a known key connects from a new address. They go when their bouncer is deleted.
Deleting a bouncer revokes its API key at once. The other system then fails with 401 errors until you give it a new key.
¶ Troubleshooting
| Symptom | Likely cause | Fix |
|---|---|---|
tls: failed to verify certificate |
The Root CA is not installed where the bouncer looks for it | Redo Step 3, and check the bouncer’s own tab |
401 Unauthorized |
The API key is wrong or was revoked | Make a new key on the Bouncers page, and update the other system |
404 Not Found |
The address is missing the /lapi/ path |
Use https://crowdsec.protected.lan/lapi/ |
no such host: crowdsec.protected.lan |
The other system cannot find the name | Redo Step 2 (DNS or hosts file) |
| The connection times out | The other system’s address is not allowed on the Defend-O-Tron’s firewall | Add it to Management allowed addresses on the Firewall page (guide) |
connection refused |
Something between the other system and the Defend-O-Tron blocks TCP 443 | Open the path: the LAPI uses standard HTTPS |
| Last read stays empty | The bouncer is not running, or keeps failing | Check the bouncer’s service status and logs on the other system |
¶ Related Pages
- Connect Another System to the Block List: the step-by-step guide with screenshots.
- Certificates: install the Root CA on the other system.
- Use the Defend-O-Tron for DNS: make
crowdsec.protected.lanresolve on your network. - Decisions: the bans the bouncers receive.